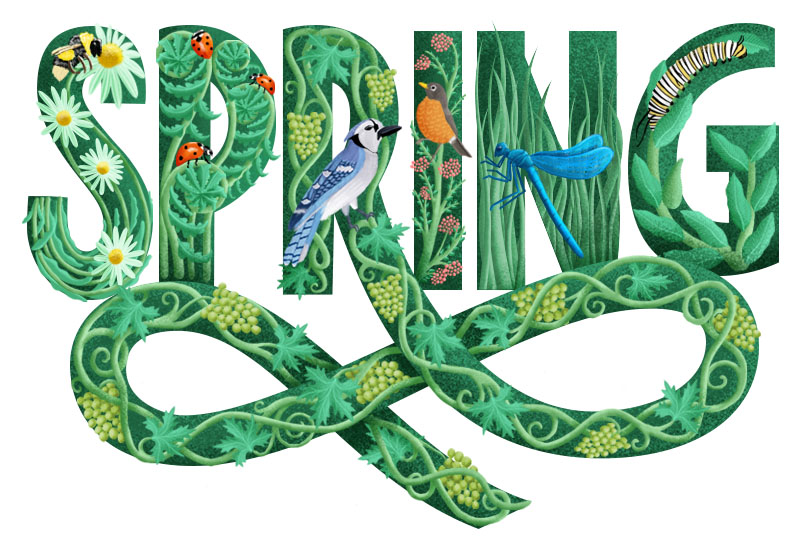
Hello! Spring is pretty much here! And in this weeks newsletter, I'll walk you through some of the process behind the creation of my latest spring inspired illustrative lettering piece.

1. Decide on a word and concept / Research and collect a visual catalogue of your elements.
The weather here in Wisconsin has been beautiful lately, so choosing my word "Spring" and concept of wildlife and growth came really easily. When you have decided on a word and concept for your project, jot down a list of elements that could potentially make it into your project. For me, my list included things like: flowers, birds, plants, trees, buds, leaves, insects. After creating my list, I started to do some research online.

Now that we have a list of some of the things we want to incorporate into our design, we can start to do a little bit of visual research. One of my favorite online resources for image research is Pinterest. Honestly, I am not really into pinning images to boards. I save the images I like to my a folder in my documents, so I can later design my own board in Adobe Illustrator.
2. Sketch a skeleton of your word
Now, it's time to develop the bare bones of the lettering composition. Start sketching small mono-line thumbnails to quickly explore a bunch of possible directions. I went through a few options, and worked with script, serif, and sans-serif letters. Now that you have explored some options, chose one to move forward with and begin to work at a larger scale.

3. Refine your chosen sketch

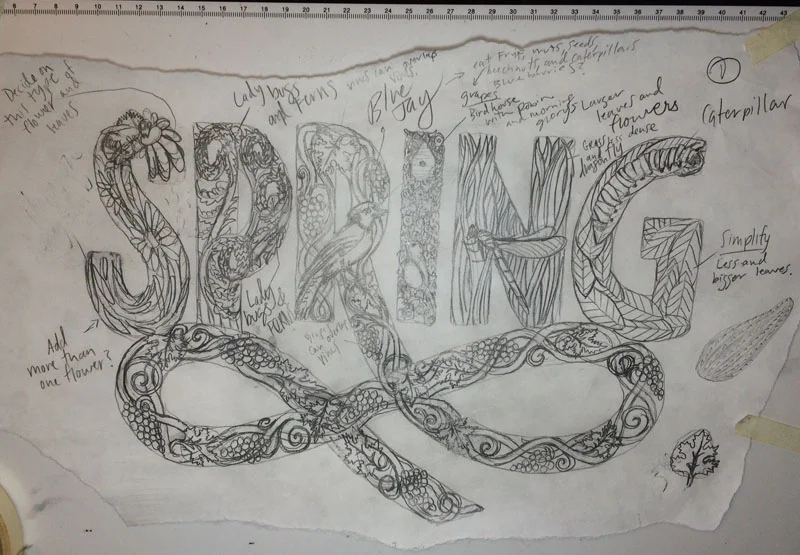
My first refinement at a large scale starts with me drawing a baseline and cap height. I then draw each letter from left to right, trying to pay attention to width consistencies.

Once I had the lettering to a decent place, I decided to sketch in the ornamental extension of the leg of the "R".


Filling in your outlines will give you a better sense of the real weight of the letters. I used an old Tombow brush pen and dipped it in ink to quickly fill in the letters.
4. Start sketching within your letters - Continue Research
Once you have your lettering to a solid place, you can start drawing within each letter. Refer back to the board you designed in the beginning of the process, and consider how each element could be drawn to fit within each letter. I recommend choosing two elements from your board, and then doing further image research on each element. For instance, When I decided that I wanted to use the Blue Jay, I did some research on Blue Jays and found out that they eat fruit and have been known to eat grapes. So it really just takes a little bit of time to firstly, decide what you want to include, and secondly researching other elements to compliment.

Here is a more refined pencil sketch.
5. Go Digital - Scan you sketch, bring into photoshop!
Since we have already laid out the ground work for what we are trying to accomplish, we can approach working digitally with confidence. I recently invested in a Wacom Cintiq, and I highly recommend you invest in a digital tablet if you are looking to get into more digital work in photoshop. Digital tablets are an incredibly powerful tool that speeds up workflow, and makes digital work a bit more hands on. It looks like Wacom has some pretty cheap models now days, so definitely look into it!

To add color, I used a combination of painting on layers with the paint brush tool (b), and drawing shape layers with the pen tool. Another thing is, you can bring in reference images into the document, and grab colors from the image to use in your illustrations.